Printers are popular for keeping your paperwork organized and minimized. Functional drums of printers maintain productivity, and you can easily access the device whenever you need it.
However, glitches might appear out of nowhere, and you might not be able to avoid them. Brother Printer service center dubai of printer repair near me technician have come up with solutions to fix the Brother printer drum error.
The possible reasons behind the drum error message might be the dirty corona wire or the inappropriate setup of the drum. You have to slide the green tab on drum units to clean the corona wire.
Let’s check out the detailed guide on how to solve printer drum errors efficiently through this guide.
How to Solve the Brother Printer Drum Error?
Whether you have been using the default printer drum or replaced the drum recently, the same drum error warning might confuse you. It’s better to start with some basic steps to eradicate the message and clean the corona wire. Here’s what you need to follow:
Clean the Corona Wire
Mostly, it’s the dirty corona wire that leads to the drum error message. You need to open up the casing of your printer and be precise with the process.
Or else, you can take the help of printer repair near me Technician’s printer repair specialists. They are pretty ingenious and experienced in handling printer repair and maintenance services.
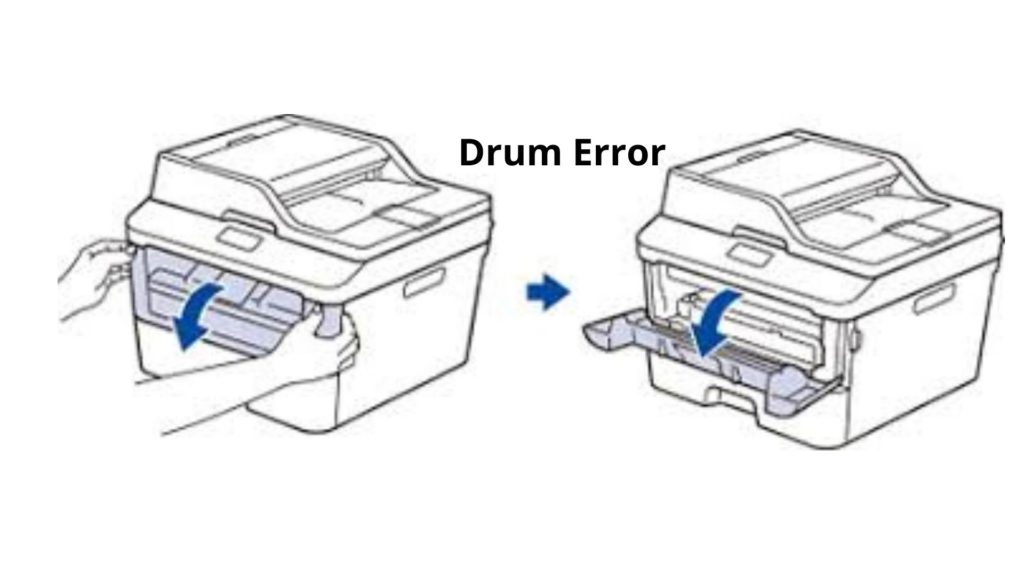
- Position your printer properly and open its front cover. Detach the assembly of the drum unit and toner cartridge. Place the assembly on a piece of paper so that it doesn’t cause unnecessary spilling toner.
- Now, pay attention to the drum unit and slide the green tab of the drum unit. Slide the tab multiple times, and don’t forget to return it to its original position. When you are done with cleaning the corona wire, the green tab should sit in its home position.
- Otherwise, the drum will again refuse to work with your printer. Moreover, you can experience a vertical stripe down on the printed pages.
- Further, you have to clean a few more counterparts. You can find two small metal pieces while facing the toner cartridge and drum straightaway. They resemble staples, and there should be a metal rod, as well. Get a clean, lint-free, and dry cloth to clean those metal pieces.
- Now, it’s time for you to insert the toner cartridge and drum unit assembly back into the printer. Place them perfectly and test a print to ensure that you have eradicated the Brother printer drum error.
Points to Remember
You should bring the green tab back to its home position after you are done with the clearing. Additionally, the professionals of Printer repair near me Technician insist that you should opt for only genuine Brother drum unit and toner cartridge assembly.
Every Brother printer or any other printer is designed according to a definite print-ink technology, and they come with fixed and pre-set temperatures. A specific printer should use only the recommended counterparts.
If you go for any other drum unit or toner cartridge, then they might not work according to your device mechanism. And, the total printing setup will be busted. If you go for cheap and non-genuine products for your Brother or any other branded printer, you are compromising its reliability and durability. Additionally, it might lead to hardware damage to the printer.
As a result, you might have to seek professional repair help for your printer issues. However, Brother won’t provide you with warranty-proof services if you use third-party counterparts for your printer. You can contact printer repair near me technician engineers if you need help with your printer repair and other related services.
Reset the Printer Drum
Well, it might not be the corona wire and its cleanliness all the time. A quick reset of the printer drum can also resolve the issue for you. Resetting the drum might eliminate the Brother printer drum error. Use the following instructions to perform a successful drum reset.
- Start with removing the casing or front cover of the printer.
- When the front cover is still open, you must press the Clear or Back option. The printer might show you the message, ‘Replace Drum? 1. Yes 2. No’.
- Opt for 1, and your printer might flash you an Accepted message. Additionally, it will show you a message that states that the cover is open.
- The printer will instruct you to close the cover. If the same drum error appears on your printer you have to repeat steps from 2.
Hopefully, you will get rid of the printer drum error after these steps.
We have another alternative way to reset the drum unit after replacing the drum unit. Go through the instructions carefully for your Brother printer:
- Keep your printer On. Make sure that you have closed the front cover of your printer when you have positioned the new drum unit.
- After that, you need to press and hold the OK and Navigation Up buttons simultaneously for a while.
- Next, you have to press the OK button to choose the Drum option.
- Finally, you can go for the Navigation Down button and press it for a successful reset of the drum counter.
Any Final Thoughts?
If you haven’t tried that solution yet, your printer might require a drum replacement to overcome the error. So, if you’re still facing the Brother printer drum error message, then you should consider contacting Printer repair near me Technician experts. They are award-winning service providers who render genuine and guaranteed printer repair assistance.